| | Wagon progress pics |  |
|
+459vista PontiaCat59 59 Blue Bomber markymark 8 posters |
|
| Author | Message |
|---|
markymark

Posts : 152
Join date : 2010-04-12
Age : 57
Location : Vernon, B.C., Canada
| | Subject: Wagon progress pics Fri Mar 18, 2011 1:08 am | |
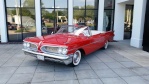
| Finally started a flickr account and thought I'd put up a few pics as she stands today. I finally put the car on the ground for the first time this week and am pretty happy with the 2" drop height. Brakes all charged up, now working on the f*&%#$$ headliner!! Now that I know how to use flickr I'll try a few more shots as it progresses. http://www.flickr.com/photos/markkrahn/sets/72157626166619081/ | |
|
| | |
59 Blue Bomber
Posts : 199
Join date : 2010-06-05
Age : 53
Location : Corbett, Oregon
| | Subject: Re: Wagon progress pics Fri Mar 18, 2011 8:57 pm | |
| Mark- What a sweet lookin' wagon! I just love the wide whites. The wood in the back is awesome. It looks like bamboo. What is it? Keep us posted on the progress, it looks great! | |
|
| | |
PontiaCat59
Posts : 202
Join date : 2008-06-10
Location : Virginia
| | Subject: Re: Wagon progress pics Sun Mar 20, 2011 9:38 pm | |
| Extra wide and extra long (or so it seems)! Very sleek wagon! | |
|
| | |
markymark
Posts : 152
Join date : 2010-04-12
Age : 57
Location : Vernon, B.C., Canada
| | Subject: Re: Wagon progress pics Mon Mar 21, 2011 12:57 am | |
| The wood in the back is actually a "wheatgrass" lino- trying to kill some of the red going on in there- abit too intense for me! More pics in a week or two.
By the way, has anyone ever installed aftermarket seatbelts? I've bought some from Jamco, ...do I just bolt them to the floorboards with a couple of skookum washers?? Lets face it, the weight of this yacht should put me at an advantage in 90% of collisions anyway! | |
|
| | |
59 Blue Bomber
Posts : 199
Join date : 2010-06-05
Age : 53
Location : Corbett, Oregon
| | Subject: Re: Wagon progress pics Mon Mar 21, 2011 1:10 am | |
| Mark- Skookum? I actually had to google that to find out what that was! Apparently it's Chinook Jargon for something strong. Anywho.....I would look at an old vehicle, say, from the '70's that has lap belts, to see their placement. Most seatbelts are held in with captive nuts welded on the bottom side of the floor, usually on the Upside of a curve or floorboard for strength. I don't think it would be a problem bolting them in with 1/2" Grade 8 bolts and lock washers. Skookums will work, too. Provided you can coax them into the trap. Your on your own with bait, since I don't have a clue what they eat. Chad | |
|
| | |
markymark
Posts : 152
Join date : 2010-04-12
Age : 57
Location : Vernon, B.C., Canada
| | Subject: Re: Wagon progress pics Mon Mar 21, 2011 1:51 am | |
| Haha-I have no idea at what point I started using that word. On the curve of the tunnel is what I was eyeing as well. Thanks! Oh, skookums, they eat chicken I'm pretty sure. | |
|
| | |
59vista

Posts : 303
Join date : 2008-05-23
Age : 51
Location : Denmark
| | Subject: Re: Wagon progress pics Mon Mar 21, 2011 6:50 pm | |
| I installed seatbelts in the backseat - 3 sets of lab belts. I drilled through the bottom, and used thick large washers that came with the belts. They are about an inch in diameter, and amybe 1/8 thick. The bolts that came with it is fine thread, and high strength steel.
I also bought two for the front seats, but so far i have not found a clever way to install them, since the seats moves. | |
|
| | |
CATBIRD
Posts : 307
Join date : 2008-07-03
Age : 81
Location : Levittown, Pa
| | Subject: Re: Wagon progress pics Tue Mar 22, 2011 12:40 am | |
| markymark.....The best place for mounting the inboard belt is to the driveshaft tunnel, just above where the floorboards turn up into the tunnel. Ideally they should make a straight run forward, but that's an impossibility unless you mounted them under the back seat. The best thing to do is to sit in the car and adjust the seat to where you are confortable. Run the belt between the seat and seatback, and down at an angle that doesn't interfere too much with the rear seat passengers. With 4 door sedans and wagons you will probably have to cut a slit to feed the belt back. The outboard belt could be mounted to either the flat part of the floor pan between the side of the seat and the door, or to the outer verticle part of the rear floor pan in the same manner as the inboard belt.
Chad is correct about the hardware. Use nothing but grade 8 1/2" fine thread bolts, nuts, and the biggest flat washers you can find. The larger the washers are the more the load is spread. I also used a lock washer on mine. I'm supprised your belts didn't come with the hardware......John | |
|
| | |
markymark
Posts : 152
Join date : 2010-04-12
Age : 57
Location : Vernon, B.C., Canada
| | Subject: Re: Wagon progress pics Thu Mar 24, 2011 8:45 pm | |
| | |
|
| | |
59 Blue Bomber
Posts : 199
Join date : 2010-06-05
Age : 53
Location : Corbett, Oregon
| | Subject: Re: Wagon progress pics Thu Mar 24, 2011 9:32 pm | |
| Mark- Now that's a nice looking Brookwood! What a neat picture.....He sure looks proud! I love it just because it's a Chevy! Just don't go posting any F@rd's....HA HA. How did you find it and how much did you pay for it?. Give us some info, when you have time, about the car. Looking forward to seeing progress pictures. | |
|
| | |
markymark
Posts : 152
Join date : 2010-04-12
Age : 57
Location : Vernon, B.C., Canada
| | Subject: Re: Wagon progress pics Fri Mar 25, 2011 12:19 am | |
| Paid $1200 for the car-its been sitting for decades, and though the rockers are gone, the frames good. Its 283, 3 on the tree. The nice thing about this restoration is alot of the parts look the same as the Pontiac. The only downside was the $850 shipping fee, but it just seems cars like these are still sitting in abundance in prairie farmyards. Still has the original paintjob too! As far as what he wants to do with the car, I think as we tear it apart the vision will come. First lesson for my son: if you take a bolt, nut or screw off the car, label it, bag it or put it back! | |
|
| | |
59 Blue Bomber
Posts : 199
Join date : 2010-06-05
Age : 53
Location : Corbett, Oregon
| | Subject: Re: Wagon progress pics Fri Mar 25, 2011 12:50 am | |
| Mark- Not a bad deal at all. $850 does sound a bit steep, but the main thing is you got it home in one piece. It will be a great learning experience for him (and you) bringing her back to life. You are right about the tag it and bag it rule. I have about 50 of those little tackle box style storage containers for just such jobs. I prefer the clear ones that lay flat and open like a briefcase. Tape or a magic marker works well for identifying what's in it before you even open it. Another thing is those Glad-lock containers witht the blue lids. Life savers for bigger things like wiper motors and door handles, etc..with loose parts. My Son, who is 4, loves working on stuff with me. | |
|
| | |
starchief_59
Admin

Posts : 1883
Join date : 2008-05-22
Age : 38
Location : Canyon Lake, Texas
| | Subject: Re: Wagon progress pics Sat Mar 26, 2011 3:49 pm | |
| That is way too cool! I want a wagon! | |
|
| | |
PontiaCat59
Posts : 202
Join date : 2008-06-10
Location : Virginia
| | Subject: Re: Wagon progress pics Sun Mar 27, 2011 9:02 pm | |
| I installed 6 pair of seatbelts that I got from Seatbeltsplus.com. Rear seat belts were a little tricky as I had to mount them fairly high so they could come over the bench seat and not be pinched by the vertical back rest. Will try to post a picture (usually not very successful with posting.) https://servimg.com/view/13749608/39 | |
|
| | |
markymark
Posts : 152
Join date : 2010-04-12
Age : 57
Location : Vernon, B.C., Canada
| | Subject: Re: Wagon progress pics Sun Mar 27, 2011 10:04 pm | |
| thanks alot-I was wondering where to place those front belts | |
|
| | |
59 Blue Bomber
Posts : 199
Join date : 2010-06-05
Age : 53
Location : Corbett, Oregon
| | Subject: Re: Wagon progress pics Sun Mar 27, 2011 10:41 pm | |
| Rear seat belts are hard to put in, since they were never offered for the back and no provisions were provided. A friend of mine put seat belts in his '56 Chevy 210. He didn't want to drill holes in the floor. The genius he was and proud of his "stealth" installation, he showed off his handy work. He installed them to the seat frame!
Sadly, Less than a year later, he was hit from behind by a drunk driver. He was obviously catapulted forward and found out just how hard a non padded dash hurts and what a GM steering wheel tastes like. He survived, but missing a few teeth and a broken nose.
The seat belts held...but the impact pulled the bolts AND captive nuts holding the seat THROUGH the floor. Lesson learned...NEVER attach seat belts to the seat and use high quality, largest diameter bolts possible to attach them. Drinking and driving is also NEVER a good idea...at all. | |
|
| | |
markymark
Posts : 152
Join date : 2010-04-12
Age : 57
Location : Vernon, B.C., Canada
| | Subject: Re: Wagon progress pics Thu Mar 31, 2011 1:03 am | |
| http://www.flickr.com/photos/markkrahn/5576260958/in/set-72157626166619081/The new roof rack is back from the chrome shop and peiced together with my son in law tonite! Before I try and fab something up, I'm wondering if anyone might have any of the rubber rail strips that go between the roofrack and the body-Im missing one. I realise that part is virtually non existent, but one never knows. | |
|
| | |
59 Blue Bomber
Posts : 199
Join date : 2010-06-05
Age : 53
Location : Corbett, Oregon
| | Subject: Re: Wagon progress pics Thu Mar 31, 2011 1:24 am | |
| Okay, now I'm officially jealous! I don't have a wagon, but that is bitchin'!!! That thing will look sweet on the roof of your wagon, for sure.
Mark- What does the rubber strip look like? Are you missing all of them? Post a picture perhaps? There is a wagon in Vancouver, WA at All American Classics, not sure if it still has the rubber or not, but maybe if it did, they could be copied......just a thought. I'll check tomorrow.....
I had the opportunityto buy an original classic racks roof rack for a hundred bucks and missed it. The racks were originally made in Portland, Oregon from the 1940's to '60's. Now they are reproduced through classicracks for about $1200.00.
I'd still like one for the Catalina, but not for $1200 clams! I may get lucky and find one some day. I think it'd be neat for car shows and put the vintage luggage and picnic basket I have in it for fun!
| |
|
| | |
markymark
Posts : 152
Join date : 2010-04-12
Age : 57
Location : Vernon, B.C., Canada
| | Subject: Re: Wagon progress pics Thu Mar 31, 2011 1:36 am | |
| Thanks Blue Bomber-my son in law made the oak strips-gives it abit of a beach feel I guess. Believe me, the chroming wasnt too much less than a new one.
Re: the wagon in Vancouver, I'm wondering if he'd sell the roof rack too? My sons chevrolet needs one. Is there a website for them?
As far as the rubber strip goes, it slides inside a channel under the stainless cross peices (kinda hard to explain). I think if I were to make one I'd just glue a peice of rubber from a bike tube on or hunt around the hardware store for something. | |
|
| | |
59 Blue Bomber
Posts : 199
Join date : 2010-06-05
Age : 53
Location : Corbett, Oregon
| | Subject: Re: Wagon progress pics Thu Mar 31, 2011 2:10 am | |
| Mark- I think you're on the right track witht the rubber. Try a marine supply store, they may have different types of materials to experiment with.
Not sure about the wagon, if it even has a rack on it or not. Their website is [url=allamericanclassics.com]allamericanclassics.com[/url]
They do have a complete list of cars, but not pictures of every car, just some of the featured cars. I will call them (I have them on speed dial) tomorrow and see if they have any for any of the GM wagons of that era..You never know! | |
|
| | |
59 Blue Bomber
Posts : 199
Join date : 2010-06-05
Age : 53
Location : Corbett, Oregon
| | Subject: Re: Wagon progress pics Thu Mar 31, 2011 2:41 am | |
| Mark- Here is waht All American Classics has:
1959 Pontiac Wagon Unit # G02582
1959 Pontiac Safari Unit # C01201
1959 Pontiac Wagon Unit # H02805
1959 Chevy Wagon Unit # AJ0402
1959 Chevy Parkwood 4 dr wagon Unit # B00740
Use the above numbers when calling them ,it will make it simpler.
Hope this helps......Chad | |
|
| | |
markymark
Posts : 152
Join date : 2010-04-12
Age : 57
Location : Vernon, B.C., Canada
| | Subject: Re: Wagon progress pics Fri Apr 01, 2011 1:08 am | |
| Thanks-I'll phone them next week | |
|
| | |
markymark
Posts : 152
Join date : 2010-04-12
Age : 57
Location : Vernon, B.C., Canada
| | Subject: Re: Wagon progress pics Fri Apr 15, 2011 9:14 pm | |
| Im wondering if I could use the collective genius of our members to find a new pressure hose for the wagon. Got her all fired up this week (and running beautifully I might add) and have a slow drip from the pressure hose (a bent flange on the pump side-thought it might be okay). So I need a new hose-Canadian auto parts stores are all at a loss and an internet search comes up empty. Any leads? Thanks!! | |
|
| | |
59vista
Posts : 303
Join date : 2008-05-23
Age : 51
Location : Denmark
| | Subject: Re: Wagon progress pics Mon Apr 18, 2011 5:13 pm | |
| If you mean the hydraulic hose on the power steering pump, you might want to try your local hydraulic service shop - they usually make hoses with fittings according to your wishes.... I have a hydraulics company not far from here, and they have helped me out whenever i needed a special hose. | |
|
| | |
SafariRod

Posts : 14
Join date : 2011-02-19
Age : 44
Location : Tofield, Alberta
| | Subject: Thanks Sat Apr 23, 2011 1:26 am | |
| Hey guys, this is exactly what I was trying to figure out today as well...this forum really has been a WEALTH of knowledge for a fledgling in the Poncho market such as myself. I'm also wondering if anyone has been able to track down NEW side mirrors for the 59's anywhere. I have checked a few places but no one seems to have them that I can think of. Anyway help would be appreciated... | |
|
| | |
Sponsored content
| | Subject: Re: Wagon progress pics | |
| |
|
| | |
| | Wagon progress pics | |
|
